0. RadioButton & CheckBox
이번에에 알아볼 View 는 RadioButton과 CheckBox가 되겠다.
문제지,설문지 등에서 흔히 볼 수 있는 Button의 종류로 (선택됨/선택안됨)의 2가지의 상태값을 가지는 점이 공통점이고 차이점은 다음과 같다.
- RadioButton : 한 RadioGroup 안의 다중 선택지(RadioButton) 중에서 하나의 선택만 가능하다.
- CheckBox : 다중 선택지(CheckBox) 중에서 여러개를 동시 선택 가능하다.
매우 간단한 예제이므로 함께 알아두도록 하자.
1. 기능 구현
- RadioGroup 안에 선택지(RadioButton)을 만들고 상태값 변화 확인과 결과값을 메세지로 띄어보자.
- 선택지를 만들고 선택된 CheckBox 의 내용들을 모두 합친 텍스트를 결과값으로 보여주도록 해보자.
2. Android Studio에서 기본 프로젝트(with empty activity) 생성하자!
생성시 'Empty Activity'로 기본 생성
3. ViewBinding 사용을 위한 build.gradle 설정
android {
    // 뷰 바인딩 옵션 활성화
    viewBinding {
        enabled = true
    }
}
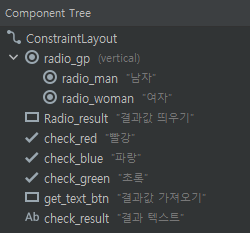
4. activity_main.xml
- 화면구성(Component Tree)를 적당히 다음과 같이 만들어보자.
<?xml version="1.0" encoding="utf-8"?>
<androidx.constraintlayout.widget.ConstraintLayout xmlns:android="http://schemas.android.com/apk/res/android"
    xmlns:app="http://schemas.android.com/apk/res-auto"
    xmlns:tools="http://schemas.android.com/tools"
    android:layout_width="match_parent"
    android:layout_height="match_parent"
    tools:context=".MainActivity">

    <RadioGroup
        android:id="@+id/radio_gp"
        android:layout_width="wrap_content"
        android:layout_height="wrap_content"
        android:layout_marginTop="80dp"
        app:layout_constraintBottom_toTopOf="@+id/Radio_result"
        app:layout_constraintEnd_toEndOf="parent"
        app:layout_constraintStart_toStartOf="parent"
        app:layout_constraintTop_toTopOf="parent">

        <RadioButton
            android:id="@+id/radio_man"
            android:layout_width="match_parent"
            android:layout_height="wrap_content"
            android:text="남자" />

        <RadioButton
            android:id="@+id/radio_woman"
            android:layout_width="match_parent"
            android:layout_height="wrap_content"
            android:text="여자" />

    </RadioGroup>

    <androidx.appcompat.widget.AppCompatButton
        android:id="@+id/Radio_result"
        android:layout_width="wrap_content"
        android:layout_height="wrap_content"
        android:layout_marginTop="16dp"
        android:text="결과값 띄우기"
        app:layout_constraintEnd_toEndOf="parent"
        app:layout_constraintStart_toStartOf="parent"
        app:layout_constraintTop_toBottomOf="@+id/radio_gp" />

    <CheckBox
        android:id="@+id/check_red"
        android:layout_width="wrap_content"
        android:layout_height="wrap_content"
        android:layout_marginTop="80dp"
        android:text="빨강"
        app:layout_constraintBottom_toTopOf="@+id/check_blue"
        app:layout_constraintEnd_toEndOf="parent"
        app:layout_constraintStart_toStartOf="parent"
        app:layout_constraintTop_toBottomOf="@+id/Radio_result" />

    <CheckBox
        android:id="@+id/check_blue"
        android:layout_width="wrap_content"
        android:layout_height="wrap_content"
        android:text="파랑"
        app:layout_constraintBottom_toTopOf="@+id/check_green"
        app:layout_constraintEnd_toEndOf="parent"
        app:layout_constraintStart_toStartOf="parent"
        app:layout_constraintTop_toBottomOf="@+id/check_red" />

    <CheckBox
        android:id="@+id/check_green"
        android:layout_width="wrap_content"
        android:layout_height="wrap_content"
        android:text="초록"
        app:layout_constraintBottom_toTopOf="@+id/get_text_btn"
        app:layout_constraintEnd_toEndOf="parent"
        app:layout_constraintStart_toStartOf="parent"
        app:layout_constraintTop_toBottomOf="@+id/check_blue" />

    <androidx.appcompat.widget.AppCompatButton
        android:id="@+id/get_text_btn"
        android:layout_width="wrap_content"
        android:layout_height="wrap_content"
        android:layout_marginTop="16dp"
        android:text="결과값 가져오기"
        app:layout_constraintBottom_toTopOf="@+id/check_result"
        app:layout_constraintEnd_toEndOf="parent"
        app:layout_constraintStart_toStartOf="parent"
        app:layout_constraintTop_toBottomOf="@+id/check_green" />

    <TextView
        android:id="@+id/check_result"
        android:layout_width="wrap_content"
        android:layout_height="wrap_content"
        android:layout_marginTop="26dp"
        android:layout_marginBottom="158dp"
        android:text="결과 텍스트"
        android:textSize="34sp"
        app:layout_constraintBottom_toBottomOf="parent"
        app:layout_constraintEnd_toEndOf="parent"
        app:layout_constraintStart_toStartOf="parent"
        app:layout_constraintTop_toBottomOf="@+id/get_text_btn" />

</androidx.constraintlayout.widget.ConstraintLayout>
- 결과물

5. MainActivity.kt
radioGp.setOnCheckedChangeListener : RadioButton의 상태값이 변화될때 메세지로 띄우기
radioBtn.setOnClickListener : RadioButton의 선택 결과값을 메세지로 띄우기
getTextBtn.setOnClickListener : 선택된 CheckBox의 내용을 모두 합친 텍스트를 결과로 출력
class MainActivity : AppCompatActivity() {

    private var mBinding:ActivityMainBinding? = null
    private val binding get() = mBinding!!

    override fun onCreate(savedInstanceState: Bundle?) {
        super.onCreate(savedInstanceState)
        mBinding = ActivityMainBinding.inflate(layoutInflater)
        setContentView(binding.root)

        // RadioButton
        val radioGp = binding.radioGp
        val radioMan = binding.radioMan
        val radioWoman = binding.radioWoman
        val radioBtn = binding.RadioResult

        // CheckBox
        val checkRed = binding.checkRed
        val checkblue = binding.checkBlue
        val checkGreen = binding.checkGreen
        val getTextBtn = binding.getTextBtn
        val resultText = binding.checkResult

        radioGp.setOnCheckedChangeListener{ radioGroup, i ->
            if(i == radioMan.id){
                Toast.makeText(this, "남자", Toast.LENGTH_SHORT).show()
            }else if(i == radioWoman.id){
                Toast.makeText(this, "여자", Toast.LENGTH_SHORT).show()
            }
        }
        radioBtn.setOnClickListener {
            if(radioMan.isChecked){
                Toast.makeText(this, "남자가 선택되었습니다.", Toast.LENGTH_SHORT).show()
            }else if(radioWoman.isChecked){
                Toast.makeText(this, "여자가 선택되었습니다.", Toast.LENGTH_SHORT).show()
            }else{
                Toast.makeText(this, "남자 또는 여자를 선택하세요", Toast.LENGTH_SHORT).show()
            }
        }

        getTextBtn.setOnClickListener {
            var resultString = ""
            if(checkRed.isChecked){
                resultString += checkRed.text
            }
            if(checkblue.isChecked){
                resultString += checkblue.text
            }
            if(checkGreen.isChecked){
                resultString += checkGreen.text
            }
            resultText.text = resultString
        }
    }
}
6. 실행결과
7. Reference
유투버 홍드로이드님의 안드로이드 앱 만들기 #36 Radio Button (옵션 선택 버튼)
유투버 홍드로이드님의 안드로이드 앱 만들기 #37 Check Box (옵션 선택 버튼)
- 주의할점
참고한 동영상 강의는 Java 로 진행된 강의입니다. Kotlin 을 공부하기 위한 목적으로 Java-Kotlin 간의 다른 부분에 대해서
직접 찾아가며 예제 작성을 하였고 영상이 올라온 시점이 3년 전이라 현재의 버전, API 들이 deprecated 된 경우도 있어
이 또한 현재 권장하는 API로 변경/적용 한 부분이 있어 Code가 다를 수 있으니 보시는 분들은 참고 바람.
'Android > Kotlin' 카테고리의 다른 글
| [Android, Kotlin] TableLayout (0) | 2022.05.24 |
|---|---|
| [Android, Kotlin] ViewPager2 with TabLayout (0) | 2022.05.19 |
| [Android, Kotlin] 레이아웃 (3) ConstraintLayout (0) | 2022.05.17 |
| [Android, Kotlin] VideoView (0) | 2022.05.06 |
| [Android, Kotlin] 레이아웃 (2) RelativeLayout (0) | 2022.05.06 |